Learning how to replace a thermostat is one of the most rewarding DIY projects you can tackle. Whether you face a drafty living room, an overheating car engine, or lukewarm shower water, your thermostat controls it all.
When this small component fails, comfort disappears. Utility bills spike. Repair costs climb. Mastering thermostat replacement puts you back in command. You’ll save money and regain total climate control. Let’s dive in.
What Is a Thermostat & How It Works
If you are wondering exactly what a thermostat is, it is fundamentally a temperature-sensitive switch. Its primary job is to monitor the ambient temperature of its environment—whether that is the air in a room, the water in a tank, or the coolant in an engine block. When the temperature falls outside your set parameters, the thermostat triggers the heating or cooling system to engage or disengage.
Understanding the purpose of a thermostat is essential before attempting a replacement. It acts as the brain of your climate or thermal control system. Without it, your furnace would run endlessly, or your car engine would overheat to the point of catastrophic failure. Over the years, these devices have evolved significantly, falling into three main categories.
Mechanical Thermostats: These are the older, traditional dials you often see in homes built before the 2000s. They rely on simple physics, typically using a bimetallic strip or a small glass vial of mercury. As the temperature changes, the metal expands or contracts, physically tilting the vial or moving a contact point to complete an electrical circuit. While incredibly durable, they lack the precision of modern alternatives.
Digital Thermostats: Digital models replaced the moving mechanical parts with internal electronic sensors called thermistors. As the room’s temperature changes, the electrical resistance within the thermistor changes, allowing the internal microcomputer to read the exact temperature. These offer accurate digital displays and basic programmable schedules, ensuring your system isn’t running unnecessarily when you are asleep or at work.
Smart Thermostats: The pinnacle of modern climate control, smart thermostats connect to your home’s Wi-Fi network. They utilize advanced machine learning algorithms, geofencing (tracking your phone’s location), and remote sensors to automate your home’s climate. By learning your daily routines, they provide unparalleled energy efficiency and allow you to control your HVAC system from anywhere in the world.
How Do You Know If Your Thermostat Is Bad?
Before grabbing your screwdriver, you need to confirm that the control unit is actually the problem. Many people ask, “How do I tell if my thermostat is bad?” The symptoms are usually quite distinct. The most obvious sign is an HVAC system that refuses to turn on or refuses to turn off, running constantly regardless of the setting.
Another major red flag is incorrect temperature readings. If your display says it is 72 degrees, but the room feels like a sauna or an icebox, the internal thermistor has likely failed. You can verify this by placing a standalone room thermometer next to the wall unit and comparing the readings.
Short cycling is another common indicator of a failing unit. This happens when your furnace or air conditioner turns on and off rapidly without ever completing a full heating or cooling cycle. While this can sometimes indicate a larger HVAC issue, a faulty thermostat is often the culprit, sending erratic signals to the main control board.
Is Replacing a Thermostat Easy?
The short answer is yes, for most home applications. If you are asking if replacing a thermostat is easy, the process for a standard home wall unit is highly accessible for beginners. It generally involves matching colored wires to labeled terminals, requiring no advanced electrical knowledge.
When people ask how hard it is to replace a thermostat, the answer varies based on the system. Can you DIY a thermostat? Absolutely. Upgrading a home thermostat usually takes less than half an hour.
However, replacing a thermostat in a car is a medium-difficulty task. It requires draining fluids and working around hot engine components. Water heaters present a moderate challenge, demanding strict adherence to high-voltage electrical safety protocols, but remain manageable for confident DIYers.
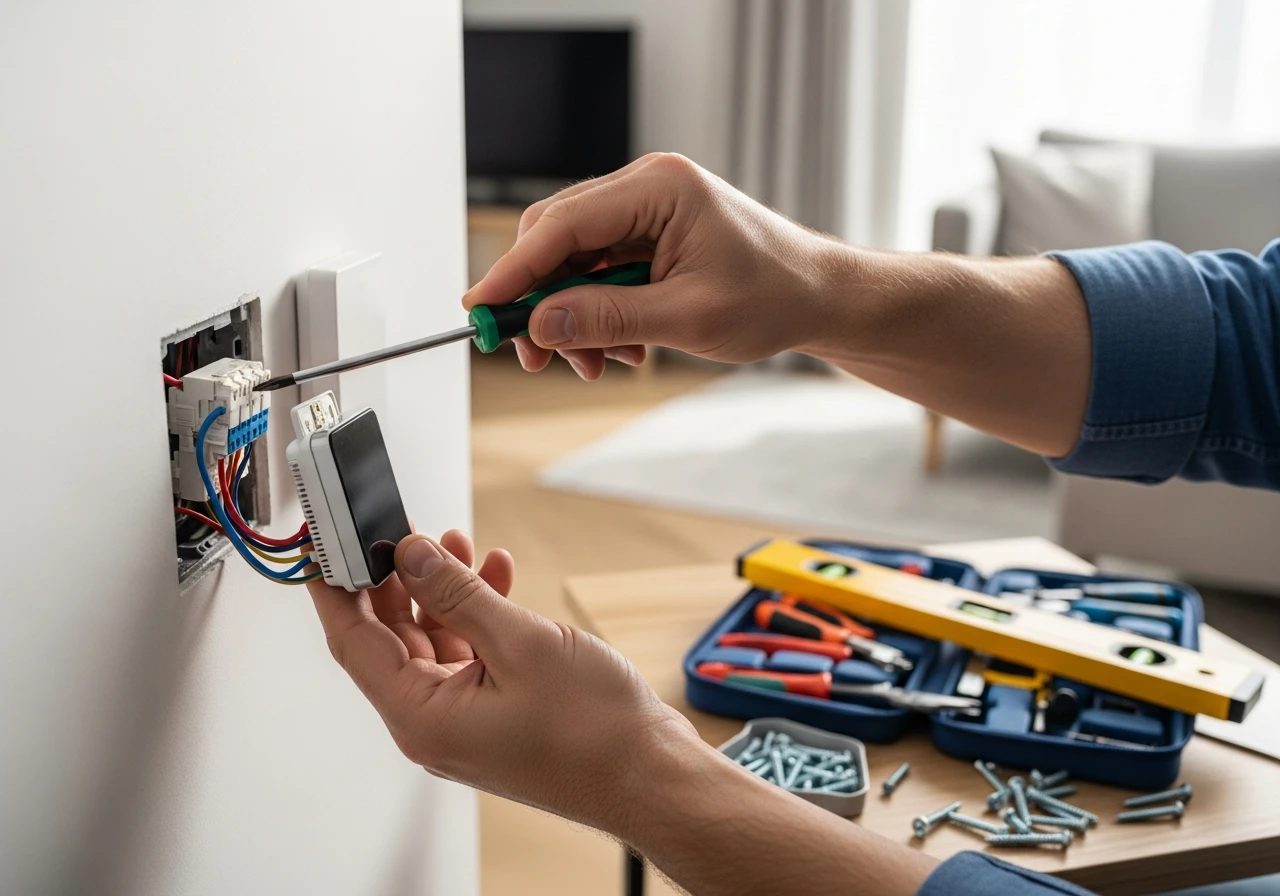
Tools You Need for Thermostat Replacement
Gathering the right tools beforehand prevents frustration mid-project. For a standard home replacement, the required tool list is refreshingly short.
- Screwdriver set: You will need both a small flathead for terminal screws and a standard Phillips head for mounting the base plate.
- Voltage tester (multimeter or pen): Essential for verifying that the power to the HVAC wires is completely dead before you touch them.
- Wire labels or masking tape: Crucial for marking which wire goes to which terminal before you disconnect the old unit.
- Needle-nose pliers: Helpful for straightening bent copper wires or tucking them neatly into the wall cavity.
- Drill (optional): If your new thermostat has a different footprint, you may need to drill new pilot holes for drywall anchors.
How to Replace a Thermostat in a House
If you need to know how to replace a thermostat in a house, this section provides the definitive blueprint. Based on years of hands-on HVAC diagnostics, following these steps ensures a safe, successful installation. Knowing how to replace a thermostat on a wall is a foundational homeowner skill.
Whether you are replacing the thermostat in your home for aesthetic reasons or mechanical failure, the core principles remain identical. Let’s break down exactly how to replace a thermostat in a home safely.
Turning Off the Power Supply
Never skip this step. Head to your home’s main electrical breaker box and locate the switch labeled “Furnace,” “Air Handler,” or “HVAC.” Flip it to the OFF position. To verify that the power is cut, try turning the old thermostat to heat or cool; the system should not respond.
Removing the Old Unit
Gently pull the faceplate of the old thermostat straight off the wall. Most snap off easily, though some may have small tabs or screws at the bottom. Expose the base plate and the wiring terminals. Do not unscrew the wires just yet.
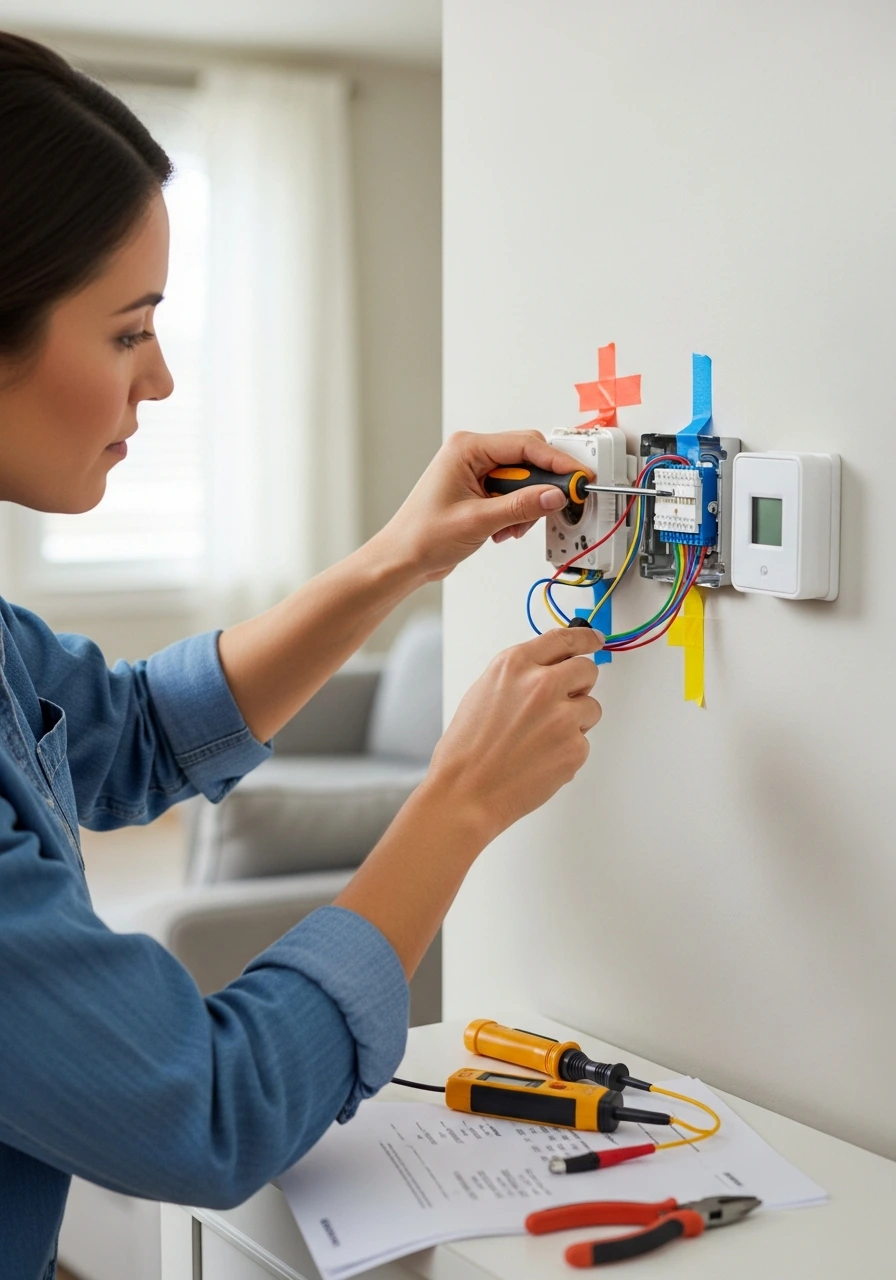
Labeling the Wiring System
This is the most critical step to avoid future headaches. Take a clear photo of the existing wiring with your smartphone. Then, use masking tape or the sticky labels provided with your new kit to tag each wire according to the terminal it is currently attached to (e.g., tag the wire on the “Y” terminal with a “Y” label). Ignore the actual color of the wire; the terminal letter is what matters.
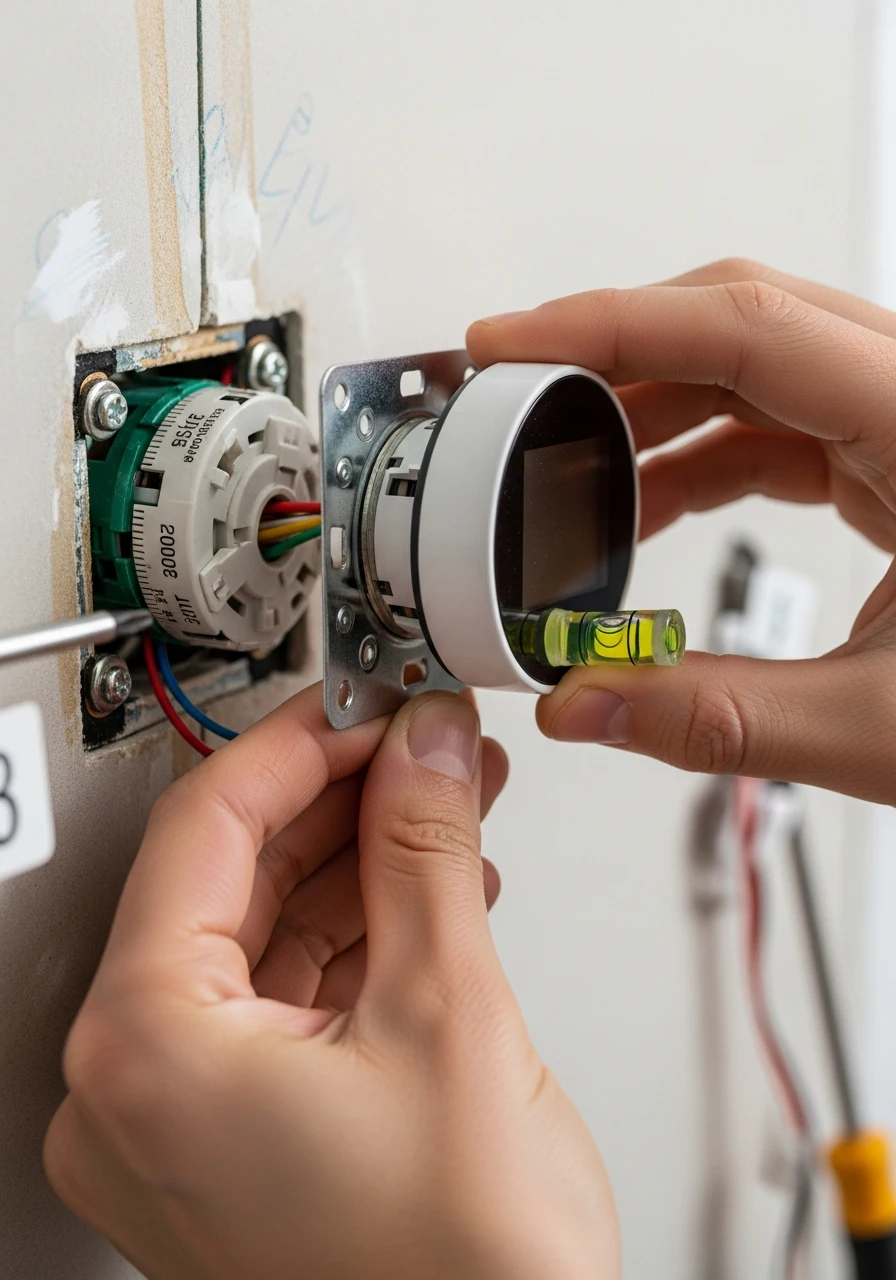
Installing the New Base Plate
Unscrew the labeled wires from the old base plate and carefully wrap them around a pencil so they do not fall back inside the wall. Unscrew the old base plate from the drywall. Take the new base plate, thread the wires through the center hole, use a small bubble level to ensure it is straight, and screw it into the wall using the provided drywall anchors.
Connecting the Wires
Using your labels and the reference photo, connect each wire to its corresponding terminal on the new base plate. If you have a wire labeled “G,” push it into the “G” terminal and tighten the set screw. Ensure the exposed copper is fully seated in the terminal and that no bare wires are touching each other.
Attaching the Display Faceplate
Once all wires are secure, gently push the excess wire length back into the wall hole. This prevents drafts from entering the back of the thermostat, which can skew temperature readings. Snap the new digital display onto the base plate, ensuring it clicks firmly into place.
Restoring Power and Testing
Return to your breaker box and turn the HVAC power back on. The new thermostat should boot up immediately. Follow the on-screen prompts to configure your system type (forced air, heat pump, etc.), and test both the heating and cooling cycles to ensure the main equipment responds correctly.
Replacing an Old Thermostat with a Digital One
Many homeowners eventually look to replace old thermostats with digital units to improve readability and efficiency. The process of replacing an old thermostat is virtually identical to the steps above, with one major caveat: older units often contain mercury.
If your old mechanical dial features a small glass bulb containing a silver liquid, that is mercury. You cannot simply throw this in the household trash. It is considered hazardous waste.
You must seal the old unit in a plastic bag and drop it off at a designated household hazardous waste facility or a participating hardware store that recycles old thermostats. Upgrading removes this toxin from your home while drastically improving your temperature control precision.
How to Replace Thermostat Wiring
Sometimes the issue isn’t the device itself but damaged wiring behind the walls. Knowing how to replace thermostat wiring can save you a costly service call. If you have a very old heating system, you might be replacing an old thermostat with only 2 wires (typically a red power wire and a white heat wire).
These simple 2-wire systems are easy to manage but limit your upgrade options. Modern smart thermostats usually require a C-wire (common wire) to provide continuous 24-volt power to their bright displays and Wi-Fi chips.
If you do not have a C-wire, you have a few options. You can run a completely new 18/5 thermostat cable from the furnace to the wall, which requires fishing wire through drywall. Alternatively, you can install a “C-wire adapter kit” (often included with new smart thermostats) at the furnace control board, which repurposes existing wires to carry the necessary power.
How to Replace a Honeywell Thermostat
Honeywell (Resideo) is one of the most ubiquitous brands in the industry. Knowing how to replace a Honeywell thermostat is a common request. The process follows the standard wall-mounting procedures outlined earlier.
If you are researching how to replace a Honeywell thermostat, pay special attention to the jumper wire. Many Honeywell base plates come with a small metal jumper connecting the “R” and “Rc” terminals. Leave this jumper in place unless you have two separate wires for heating and cooling power.
Often, users simply need to know how to replace a Honeywell thermostat battery. To do this, gently pull the faceplate away from the wall mount. The battery compartment is usually located on the back of the faceplate. Understanding how to replace a battery in a Honeywell thermostat takes only seconds and resolves many “blank screen” issues.
How to Replace Thermostat Batteries
A blank digital screen or a flashing “Low Batt” icon means it is time for a swap. If you want to know how to replace thermostat batteries, the process is incredibly simple and requires no tools.
Signs that a battery is low include a dim display, an unresponsive touchscreen, or the HVAC system failing to kick on. To fix this, grasp the outer edges of the thermostat faceplate and pull straight out.
Once removed, locate the battery slots on the back (usually requiring two AA or AAA alkaline batteries). Swap them out, ensuring correct polarity, and snap the faceplate back onto the wall mount. Knowing how to replace a thermostat battery is the first troubleshooting step before assuming the unit is broken.
How to Replace a Thermostat in a Car
Engine thermostats regulate the flow of coolant to prevent overheating. Learning how to replace car thermostat components is a vital automotive skill. If your engine temperature gauge spikes to the red zone, or your heater blows cold air, you likely need to know how to replace a thermostat in a car. Here is how to replace a car thermostat safely.
Letting the Engine Cool
Never attempt this repair on a hot engine. The cooling system is pressurized, and opening it while hot can cause severe scalding. Let the vehicle sit for at least two hours before beginning.
Draining the Coolant
Locate the radiator petcock (drain valve) at the bottom of the radiator. Place a large catch pan underneath and open the valve to drain out a few quarts of coolant, lowering the fluid level below the thermostat housing.
Removing the Housing
Follow the upper radiator hose to where it meets the engine block; this metal or plastic casing is the thermostat housing. Use a socket wrench to remove the two or three bolts securing it. Pull the housing back to expose the old thermostat.
Replacing the Component
Note the orientation of the old thermostat before pulling it out; the “jiggle pin” or spring mechanism must face the correct direction (usually toward the engine). Clean the mating surfaces of the housing thoroughly with a scraper. Insert the new thermostat and apply a new gasket or a bead of RTV silicone sealant if required by your manual.
Reassembling and Bleeding
Reattach the housing and tighten the bolts to the manufacturer’s torque specifications. Refill the radiator with the appropriate 50/50 coolant mix. Start the engine with the radiator cap off and let it run to bleed any trapped air bubbles out of the system before replacing the cap.
Car-Specific Examples
While the general automotive process is similar, specific vehicles have unique quirks.
If you need to know how to replace a thermostat in a Dodge Ram 1500, expect to find the housing at the front top of the 5.7L Hemi engine, making it highly accessible. However, you must bleed the air out through a specific bleeder screw on the water pump afterward.
For those asking how to replace a thermostat in a 2005 Honda Civic, the housing is located lower down, following the lower radiator hose, making it slightly more difficult to reach without jacking up the car.
If you are dealing with luxury vehicles, you might wonder how much a thermostat for a Cadillac XT5 is. Because these often feature electronic thermostat housings built into complex water pump assemblies, the part alone can cost over $200, with labor pushing the total replacement well past $500.
How to Replace a Water Heater Thermostat
Electric water heaters use surface-mounted thermostats to regulate water temperature. If your water is scalding hot or ice cold, you need to know how to replace a thermostat on a water heater. This applies whether you are figuring out how to replace a thermostat in a water heater or researching how to replace a thermostat on an electric water heater.
Shutting Down High Voltage
Water heaters operate on 240 volts, which is highly dangerous. Go to your main breaker panel and flip the dual-pole breaker for the water heater completely off. Use a non-contact voltage tester at the tank to confirm the power is dead.
Opening the Access Panel
Use a screwdriver to remove the upper or lower metal access panel on the side of the tank. Fold back the fiberglass insulation to reveal the thermostat, which is pressed firmly against the side of the metal tank.
Swapping the Component
Take a photo of the wiring. Disconnect the wires from the old unit and gently pry the thermostat out of its metal retaining bracket. Slide the new thermostat into the bracket, ensuring it sits flush against the tank wall. Reconnect the wires, replace the insulation and panel, and restore power. The process for replacing a thermostat on a hot water heater is entirely dry; you do not need to drain the water tank.
How to Replace a Thermostat in an Air Conditioner
Window units and standalone air conditioners have internal temperature sensors. If you are researching how to replace a thermostat in an air conditioner, the process involves unplugging the unit and removing the front grille and metal casing.
The thermostat is usually a small control board connected to a copper thermistor wire that clips onto the evaporator coils. You must unclip the old thermistor, unscrew the control dial or board, and plug in the OEM replacement part. Always ensure the new thermistor wire is clipped securely back onto the cooling fins for accurate readings.
How to Replace a Thermostat in a Refrigerator
When a fridge freezes your produce or leaves milk warm, the cold control is likely dead. To understand how to replace a thermostat in a refrigerator, first unplug the appliance.
Locate the temperature control knob housing inside the fridge compartment and remove the retaining screws. Pull the housing down to expose the internal wiring and the long capillary tube. Disconnect the wires, pull out the long tube, and carefully thread the new thermostat’s capillary tube back into the same channel before reconnecting the terminals.
How to Replace a Radiator Thermostat
Homes with boiler systems use Thermostatic Radiator Valves (TRVs). If you want to know how to replace a thermostat on a radiator, you usually only need to replace the top control head, not the plumbing valve itself.
Turn the old TRV dial to the highest setting (usually a 5 or ‘Max’) to fully open the valve and release tension. Then, unscrew the metal or plastic locking ring at the base of the dial and lift the head off. Push the new TRV head onto the pin and tighten the locking ring securely by hand.
How Much Does It Cost to Replace a Thermostat?
Budgeting is a major concern for DIYers. How much it costs to replace a thermostat depends entirely on the application. For those asking how much to replace a thermostat in a home, the cost ranges from $50 for a basic programmable unit to $300 for a flagship smart thermostat.
If you are wondering how much it is to replace a thermostat in a vehicle, parts usually cost between $20 and $60. However, how much does it cost to replace a car thermostat at a mechanic’s? Labor can push that bill to between $150 and $500, depending on engine accessibility.
For water heaters, the thermostat part is incredibly cheap, usually under $30. If you hire a plumber to do the job, expect to pay between $100 and $250 for the service call. Therefore, knowing how much to replace a thermostat in a car or home highlights the massive financial benefit of DIY.
How Long Does It Take to Replace a Thermostat?
Time is money, and knowing how long it takes to replace a thermostat helps you plan your weekend. For a standard home wall unit, a beginner can usually finish the job in 15 to 30 minutes, assuming the wiring is straightforward.
Replacing a car engine thermostat typically takes 1 to 2 hours. This accounts for letting the engine cool, draining the coolant, doing the mechanical swap, and bleeding the system of air afterward.
For an electric water heater, expect the project to take about 30 to 60 minutes. The bulk of this time is spent ensuring safety protocols are met and carefully maneuvering around the fiberglass insulation.
Do You Need an Electrician to Replace a Thermostat?
Many homeowners are intimidated by wiring and ask, “Do I need an electrician to replace a thermostat?” In the vast majority of cases, the answer is no. Home thermostats operate on low-voltage (24V) systems, which pose very little risk of severe electric shock.
However, there are exceptions where professional help is warranted. If you open your wall and find thick, braided wires secured with wire nuts, you likely have a line-voltage system (120V/240V) used for electric baseboard heaters. These are dangerous and require specific line-voltage thermostats. Additionally, if you need to run an entirely new C-wire through multiple floors of finished drywall, hiring an electrician is highly recommended.
Thermostat Compatibility Guide
Before buying a shiny new device, you must ensure it speaks the same language as your HVAC equipment. A major point of confusion is proprietary systems. For example, what thermostat is compatible with Bryant or Carrier communicating systems?
Standard smart thermostats like Nest or standard Ecobee models will not work seamlessly with proprietary communicating systems without a massive rewiring job that loses advanced efficiency features. Always check the manufacturer’s online compatibility checker. You will need to input the exact letters of the wires you currently have attached to your wall base plate to confirm if a new smart thermostat is compatible.
Should You Replace a Thermostat Yourself?
When weighing the pros and cons, should you replace a thermostat yourself? For home wall units, the answer is overwhelmingly yes. It saves you an expensive HVAC service fee and provides a great introduction to home maintenance.
Can I replace my home thermostat myself safely? Yes, provided you absolutely verify the power is off at the breaker. The main risks involve blowing a small low-voltage fuse on your furnace control board if you accidentally touch live wires together. Take your time; label everything meticulously, and the DIY route is highly rewarding.
Common Thermostat Replacement Mistakes
Even seasoned DIYers can make errors. The most frequent mistake is failing to take a picture of the old wiring. Once you remove those wires from the terminals, relying on memory is a recipe for disaster.
Another major error is failing to turn off the power. While 24V won’t severely shock you, touching the “R” (power) wire to the “C” (common) wire will instantly blow the 3-amp fuse inside your furnace, disabling the entire system.
Finally, incorrect model selection is common. Buying a low-voltage smart thermostat for a high-voltage baseboard heater will destroy the new thermostat instantly upon powering it up. Always verify your system voltage before purchasing.
When You Need Professional Installation
There is no shame in realizing you need a thermostat installed by a pro. If you lack a C-wire and are uncomfortable installing adapter kits near your furnace’s motherboard, call a technician.
Furthermore, if you are upgrading to a complex dual-fuel system (like a heat pump paired with a gas furnace), the wiring and staging configurations on modern smart thermostats can become highly complex. An HVAC professional ensures the system uses auxiliary heat efficiently, preventing massive winter utility bills.
Frequently Asked Questions
How do I install a new thermostat?
Turn off the HVAC breaker, remove the old faceplate, and label the existing wires. Attach the new baseplate to the wall, connect the labeled wires to the corresponding terminals, snap on the new display, and restore power.
How do you replace a thermostat?
Replacing it involves upgrading the physical hardware by matching the existing low-voltage wiring to a new unit. Always ensure the power is cut at the main breaker before disconnecting any copper wires.
Can you DIY a thermostat?
Yes, replacing a standard low-voltage home thermostat is highly accessible for beginners. It requires basic tools like a screwdriver and typically takes less than 30 minutes to complete.
How much is it to replace a thermostat?
Doing it yourself costs only the price of the unit, ranging from $50 to $300. Hiring an HVAC professional to install it usually adds $100 to $200 in labor charges.
Is replacing a thermostat easy?
For residential wall units, it is considered an easy DIY project. Replacing automotive or water heater thermostats is slightly more involved, requiring fluid management or high-voltage safety precautions.
Conclusion
Mastering the process of thermostat replacement is a cornerstone of modern DIY maintenance. Whether you are addressing an overheating vehicle, restoring hot water to your showers, or optimizing your living room’s climate, these temperature-regulating devices are the key to mechanical efficiency.
By taking the time to properly label wires, strictly adhering to safety protocols, and executing the installation methodically, you can save hundreds of dollars in professional labor fees. Upgrading to a digital or smart model not only resolves immediate heating and cooling issues but also actively works to reduce your long-term energy consumption. Equip yourself with the right tools, follow the steps outlined above, and enjoy total control over your environment.