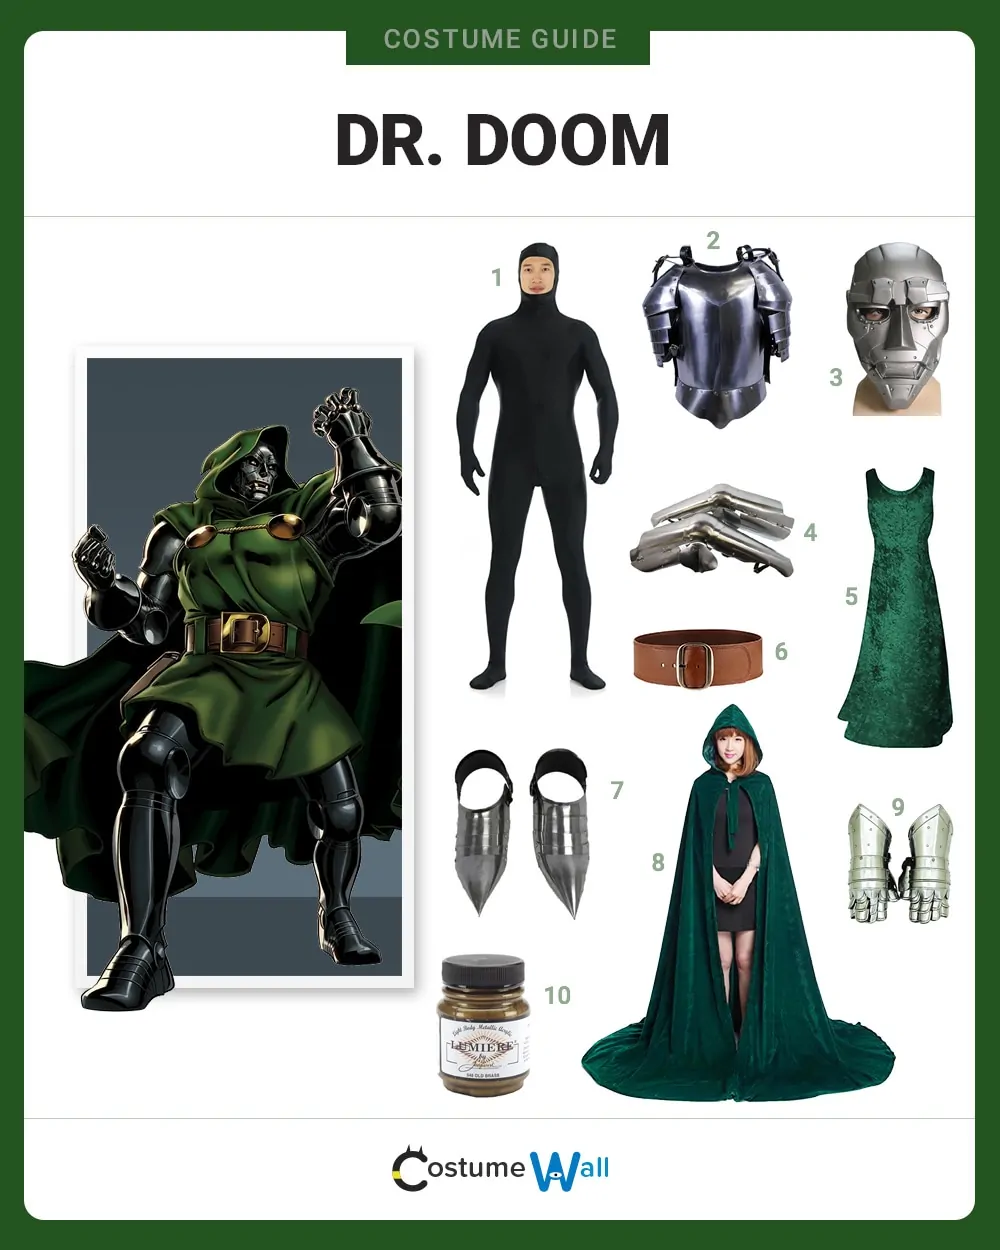
A Doctor Doom costume DIY build comes together from four core components: a metal-like armored mask, foam chest armor and shoulder armor, a hooded cloak in a green and metallic color palette, and a handful of finishing accessories like a belt and metal gauntlets.
This guide walks through each piece using beginner-friendly and advanced construction methods, so whether you’re a first-time beginner crafter or a seasoned cosplay designer, you’ll have a clear path to a convincing, convention-friendly costume.
Expect a total build time of one to three weekends and a cost breakdown ranging from roughly $60 for a budget-friendly version to $300+ for a screen-accurate, professional-grade build.
Victor Von Doom – ruler of Latveria and the definitive Marvel supervillain – is instantly recognizable thanks to three visual signatures: the distinctive mask, the armored suit underneath his robes, and the sweeping cloak and hood.
This tutorial breaks the build into manageable stages so any Marvel fan can put together a DIY costume without a background in metalworking or professional prop shops.
What You’ll Need Before You Start
Before jumping into construction, gather materials and take basic body measurements. Doing this upfront saves time and prevents wasted material later in the process.
Materials & Tools List
| Category | Materials |
| Mask | EVA craft foam, worbla (optional), heat gun, contact cement, elastic strap |
| Armor pieces | 5–10mm EVA foam sheets, craft knife, cutting mat, sandpaper |
| Paint & finishing | Plasti Dip or gesso primer, metallic paint, black acrylic for weathering, matte sealant |
| Cloak/tunic | Green polyester or cotton-blend fabric, faux leather for trim, sewing machine or hand-sewing kit |
| Fasteners | Velcro straps, elastic cord, D-rings, buckles |
| Optional/advanced | 3D printer, PLA filament, Pepakura software, fiberglass resin |
A basic cost breakdown looks like this: foam and adhesives run $30–$50, fabric for the hooded cloak adds another $20–$40, and paint/finishing supplies cost roughly $15–$25. A full budget-friendly build lands around $65–$115, while a screen-accurate version using worbla, resin coating, and a 3D-printed helmet can climb past $250–$300 once tools are factored in.
Skill Level & Difficulty
This build ranges in complexity depending on the method chosen:
- Beginner-accessible construction – foam and papier-mâché mask, hand-sewn cloak, spray-painted armor (2–4 days)
- Intermediate – heat-formed foam armor with layered detailing (1 weekend)
- Advanced costume builder track – 3D-printed armored mask, worbla-shelled armor, resin coating, and professional weathering (2–3 weekends)
The 4 Core Components of a Doctor Doom Costume
Every convincing Doctor Doom build is made of the same costume components, regardless of budget:
- Armored mask – the character’s most recognizable feature
- Chest armor and shoulder armor – layered over a black bodysuit
- Hooded cloak – the iconic green outer layer
- Accessories – belt, gauntlets, and rivets/trim detailing
How to Make the Doctor Doom Mask (DIY)
The mask is the single most important piece for a recognizable Doctor Doom appearance – get this right and the rest of the costume reads correctly even from a distance at conventions or Marvel events.
Method 1: EVA Foam Mask (Most Popular)
EVA foam is the standard material among prop makers because it’s lightweight, inexpensive, and easy to shape with heat.
- Print or trace a mask template sized to your head measurements.
- Cut foam panels using a craft knife and cutting mat.
- Heat-form curved sections (forehead, cheeks, chin) with a heat gun for a smoother, more screen-accurate fit.
- Glue panel seams with contact cement, working from the center of the face outward.
- Cut eye openings generously – visibility and ventilation matter more than screen accuracy if you’ll be wearing the mask for hours at photoshoots or conventions.
- Add an adjustable elastic strap for customizable sizing and secure fit.
Method 2: Papier-Mâché Mask (Budget Option)
For a cheap alternative with minimal tools, a papier-mâché base built over a balloon or mannequin form works well. This method is especially useful for a parent making a children’s costume, since it uses reusable materials already found at home (newspaper, flour, water) and avoids sharp tools.
Method 3: 3D-Printed Mask (Advanced Option)
If you own or have access to a 3D printer, downloadable mesh files can produce a highly screen-accurate armored mask with crisp panel lines. Print in sections if your build plate is small, then glue and sand the seams smooth before priming.
Can I make Doctor Doom armor without a 3D printer? Yes – EVA foam and papier-mâché methods produce fully wearable armor components without any printing equipment, and remain the most common approach among budget-conscious DIYers.
Painting the Mask for a Metal-Like Finish
- Apply a flexible primer (Plasti Dip or foam-safe gesso) to seal the foam.
- Base-coat in gunmetal gray or bronze.
- Layer metallic paint in silver, gunmetal, and gold-bronze tones to build a metallic armored aesthetic.
- Add realistic weathering techniques – dry-brushed black or rust-toned paint along panel edges and rivets for a realistic aged appearance.
- Seal with a matte or satin varnish to protect the metal-like finish from chipping during handling.
What paint looks like metal for Doctor Doom armor? Metallic spray paint in gunmetal, pewter, or antique bronze – followed by a black wash worked into the recessed detail lines – produces the most convincing metal-like finish without the weight of actual metal.
How to Make Doctor Doom Armor (DIY)
The chest plate, shoulder armor, and gauntlets form the costume armor layer worn over a black bodysuit or long-sleeve base layer.
Chest Armor & Shoulder Armor
- Trace a chest plate pattern using your torso measurements, or scale a downloadable costume template.
- Cut the panel from 5–7mm EVA foam for durability without excess bulk.
- Heat-form the plate slightly to curve around the chest for better wearability.
- Cut matching shoulder armor pieces and attach with straps or Velcro so they sit securely without restricting arm movement.
- Prime and paint to match the mask’s metallic effects.
Metal Gauntlets & Arm Armor
Gauntlets are built the same way as the chest plate – flat foam patterns heat-formed into a curved shape, then wrapped around forearm-length fingerless gloves. Adding faux leather strapping at the wrist improves both appearance and adjustability.
Leg Armor & Boot Covers
Shin guards follow the same armor construction process: pattern, cut, heat-form, strap, paint. Keep these panels thinner than the chest armor to preserve flexibility while walking or posing for photoshoots.
Attaching Armor to a Base Layer
Layer all armor pieces over a black bodysuit or leggings-and-top combo. This is where layered armor construction pays off – each panel should overlap slightly at the joints so the suit reads as one cohesive armored suit rather than separate floating pieces.
Making the Cloak and Hood
How do I make Doctor Doom’s cloak and hood? The iconic hooded cloak is a fairly simple sewing project even for a beginner crafter:
- Choose a medium-weight green fabric – cotton-poly blends drape well and hold shape better than lightweight polyester.
- Cut a large half-circle or rectangle panel sized to reach mid-calf.
- Construct the hood separately as a two-panel curved piece, then attach it to the cloak’s neckline.
- Add faux leather trim along the front edges and hem for a comic-accurate finish.
- Finish with a clasp or hook-and-eye closure at the collar.
Fabric selection matters here: heavier fabric holds a dramatic silhouette for conventions and photos, while lighter fabric improves ventilation and comfort for long wear.
Assembling the Full Costume
Once each piece is finished, layer them in this order for the most convincing result:
- Black bodysuit or base layer
- Leg armor and boot covers
- Chest armor and shoulder armor
- Metal gauntlets
- Belt and accessories
- Hooded cloak
- Armored mask
Check flexibility at each joint – sit, raise your arms, and walk a short distance before finalizing straps. A costume that looks screen-accurate but restricts movement will be uncomfortable at Marvel events that involve hours of standing or walking.
Budget-Friendly vs. Screen-Accurate Build
| Feature | Budget-Friendly Build | Screen-Accurate Build |
| Mask material | Papier-mâché or basic EVA foam | 3D-printed or worbla-shelled foam |
| Armor material | Craft foam, spray paint | Worbla, resin coating, layered foam |
| Cloak fabric | Polyester blend | Heavyweight cotton-poly with faux leather trim |
| Estimated cost | $65–$115 | $250–$300+ |
| Build time | 2–4 days | 2–3 weekends |
| Best for | First-time builders, Halloween costume maker projects, kids’ costumes | Advanced costume builder, competitive cosplay, professional photoshoots |
Both routes produce a recognizable Doctor Doom appearance – the difference is primarily in durability, finishing detail, and how the suit holds up across repeat wear at multiple conventions.
Common Mistakes to Avoid
- Skipping Ventilation: A sealed foam mask without airflow gaps gets uncomfortably hot within an hour.
- Ignoring Flexibility: Armor cut too rigid at the joints restricts movement and cracks under stress.
- Over-Priming: Too many primer coats add unnecessary weight and reduce lightweight construction benefits.
- Undersized Eye Openings: prioritize your ability to see clearly over strict screen accuracy.
- Skipping A Test-Fit – always try armor pieces on before final gluing to confirm adjustable strap placement.
Frequently Asked Questions
Build the four core costume components – mask, chest and shoulder armor, cloak and hood, and accessories – using EVA foam, fabric, and metallic paint. Each piece can be constructed with basic craft tools and assembled over a black bodysuit.
Cut and heat-form EVA foam panels using a sized template, glue the seams, and paint with metallic spray paint followed by black weathering in the recessed lines. Papier-mâché and 3D printing are also beginner-friendly and advanced alternatives, respectively.
A papier-mâché mask paired with spray-painted foam armor and a simple sewn cloak is the most beginner-accessible construction method, requiring no heat-forming tools or 3D printing.
Use inexpensive material alternatives like cardboard-backed foam, craft-store fabric, and standard metallic spray paint instead of worbla or resin. This keeps the total costume cost under $100.
A budget-friendly build typically takes 2–4 days of part-time work. A screen-accurate version with 3D-printed parts, worbla shelling, and detailed weathering can take 2–3 weekends.
Cut flat foam patterns for each armor panel, heat-form curves with a heat gun, glue seams with contact cement, then prime and paint. EVA foam is favored for its lightweight feel and low costume cost.
Reusable templates and patterns are available through cosplay pattern marketplaces, prop-making forums, and 3D-model repositories for printable mask files. Many are scalable to your measurements before cutting.
For a parent making a children’s costume, papier-mâché or soft craft foam is safer and lighter than rigid worbla or resin. Keep armor lightweight, use elastic instead of buckles for adjustable sizing, and prioritize ventilation in the mask.
A craft knife, cutting mat, contact cement, heat gun (optional but helpful), sewing machine or needle and thread, and spray paint cover most of the build. Advanced builders may add a 3D printer or heat press.
A full cost breakdown ranges from $65–$115 for a budget-friendly build to $250–$300+ for a professional, screen-accurate version using premium materials like worbla and resin coating.
Yes. EVA foam patterns, heat-forming, and hand-painting produce fully functional wearable armor components without any printing equipment – this remains the most common approach among hobbyist prop makers.
Metallic spray paint in gunmetal, pewter, or bronze tones, layered with a black paint wash in the panel lines, creates a convincing metal-like finish and metallic armored aesthetic.
EVA foam, green fabric, faux leather trim, metallic paint, primer, contact cement, and basic fasteners (Velcro, elastic, D-rings) cover the full costume armor and cloak build.
Apply a base coat of metallic paint, then dry-brush black or rust-toned paint into recessed panel lines, rivets, and edges. This realistic weathering technique mimics battle damage and adds a realistic aged appearance to an otherwise clean paint job.
Choose thinner foam (3–5mm) for smaller panels, avoid excess resin coating, and use elastic straps instead of rigid buckles. Lightweight construction options improve comfort significantly during long conventions.
Layer multiple paint tones, add rivet details with small foam or plastic dots, and apply detailed finishing techniques like edge weathering and panel shading to break up flat color and mimic true metal depth.