Upgrading your home with a smart climate control system is one of the most rewarding DIY projects you can undertake. Learning how to install a Nest thermostat might seem intimidating at first, but it is entirely manageable for most homeowners.
A Nest thermostat is an advanced smart home device that learns your schedule and temperature preferences. It automatically adjusts your home’s climate to keep you comfortable while significantly reducing energy waste.
People choose to install these devices primarily for the substantial energy savings and the convenience of remote control. Whether you are lying in bed or vacationing across the country, you can monitor and adjust your home’s temperature directly from your smartphone.
This guide is explicitly designed for DIY beginners with zero prior electrical experience. We will walk you through every single phase of the process, ensuring you feel confident from the moment you open the box.
By following these detailed instructions, you will safely remove your outdated system and successfully wire your new smart device. Let’s dive into the ultimate step-by-step installation process.
Can I Install a Nest Thermostat Myself?
Yes, absolutely. The vast majority of homeowners can complete a DIY Nest thermostat install without hiring professional help.
Google designed these devices specifically with the everyday consumer in mind. The systems operate on low-voltage wiring, which makes handling the cables significantly safer than dealing with standard household wall outlets.
On average, the total time required to complete the installation ranges from 20 to 45 minutes. If you have your tools ready and follow the app’s guidance, you might finish even faster.
The tools needed are minimal. You generally only need the screwdriver included in the box, your smartphone, and your home’s WiFi password.
The primary pros of DIY installation include saving money on labor costs, gaining a better understanding of your home’s HVAC system, and the immediate satisfaction of completing a home upgrade.
However, you should call an electrician if you encounter thick, stranded wires connected by wire nuts or if you see labels reading 110V, 120V, or 240V. These indicate a high-voltage system, which is dangerous and incompatible with standard Nest devices without specialized hardware.
Do you need an electrician to install Nest?
For standard residential setups, you generally do not need an electrician. If your current thermostat has thin wires and controls a basic furnace and air conditioning unit, you are looking at a simple system suitable for DIY.
Simple systems rely on 24V power. As long as you follow basic safety protocols—like turning off the power at the breaker—you can safely handle these low-voltage wires yourself.
However, complex HVAC configurations often require a professional. If you have a sophisticated dual-fuel system, a whole-home humidifier, or a proprietary communicating thermostat, professional installation is highly recommended to avoid damaging your equipment.
It is also crucial to note the UK vs. US wiring differences. In the US, thermostats generally switch low-voltage wires directly. In the UK and parts of Europe, heating systems often require a separate “Heat Link” receiver wired directly to the boiler, which involves mains voltage.
If you are installing a UK model that requires wiring into the boiler’s 230V mains, hiring a certified professional is the safest and legally compliant route.
How Hard Is It to Install a Nest Thermostat?
The difficulty of the installation depends entirely on your existing wiring setup. For most users, it is a straightforward process, but let’s break down the difficulty levels based on standard configurations.
Easy Installation (4–5 Wires) If you pull off your old thermostat and see four or five wires (typically R, W, Y, G, and C), you have the easiest setup possible. The installation will likely take less than 20 minutes, as these systems provide dedicated power and clear communication lines.
Medium Difficulty (2 Wires or No C Wire) If you only have two wires, or if you are missing a C (Common) wire, the difficulty increases slightly. You may need to install a Nest Power Connector or rely on the device’s internal battery, which requires careful setup to ensure stable WiFi connectivity.
Hard Installation (Heat Pumps and Multi-Zone Systems) Homes with advanced heat pumps (featuring O/B reversing valve wires) or multi-zone damper systems represent the hardest DIY installations. These require precise wire mapping and specific software configuration within the Google Home app to ensure your system heats and cools correctly.
Tools & Requirements Before Installation
Before you begin, gathering the right equipment will make the process seamless. You do not need a professional toolbox to get the job done right.
Here is the essential checklist of tools and requirements:
- Smartphone or Tablet: You need this for the Google Home app setup and to take reference photos.
- Active WiFi Connection: Essential for the smart features, software updates, and remote control.
- Screwdriver: A small Phillips or flathead (often included in the Nest box).
- Drill (Optional): Useful if you need to create new holes in the drywall for the wall anchors.
- Labels or Tape: Included in the box, used to mark your wires before disconnecting them.
- Voltage Tester (Optional): A helpful safety tool to confirm the power is truly off before you touch the wires.
Nest Thermostat Models Explained
Understanding which model you own is crucial, as the wiring bases and software setups differ slightly. Knowing how to install the Nest Thermostat 4th generation compared to older models ensures a smooth process.
The Nest Learning Thermostat (4th Generation) is the latest flagship model. It features a sleek, borderless glass display and upgraded internal sensors. The 4th gen model supports up to 6 wires, accommodating a massive range of standard and complex HVAC systems with improved learning algorithms.
The Nest Learning Thermostat (3rd Generation) remains incredibly popular. It features the classic metallic rotating ring and supports highly complex systems, including whole-home humidifiers and multi-stage heating. Installing the Nest Thermostat 3rd generation is straightforward thanks to its intuitive base plate.
The Nest Thermostat E was designed as a budget-friendly alternative with a frosted display. It blends into the wall seamlessly. How to install the Nest Thermostat E is slightly different, as its base plate only supports 6 standard wire terminals, making it ideal for simpler home setups.
The standard Google Nest Thermostat (sometimes called the 2020 model) features a mirrored face and a touch-sensitive side rather than a rotating ring. It requires the Google Home app directly for setup, skipping the on-device configuration used by older learning models.
Step-by-Step: How to Install Nest Thermostat
This is the core of your installation journey. Follow these steps meticulously to ensure your system operates safely and efficiently.
Step 1 – Turn Off Power Equipment
Safety is the absolute priority when dealing with home electronics. You must turn off the power to your heating and cooling system before touching any wires.
Locate your home’s main electrical panel (breaker box). Find the switches labeled “HVAC,” “Furnace,” or “Air Conditioner” and flip them to the OFF position.
To verify that the power is off, try adjusting your old thermostat. If the screen goes blank or the system refuses to turn on, you have successfully cut the power.
Step 2 – Remove Old Thermostat Display
Gently pop the faceplate off your existing thermostat. Most traditional models will simply unsnap or slide upward off the wall plate.
Before you unscrew any wires, take a clear picture of the current wiring configuration with your phone. This photo is your map; do not skip this step.
Use the sticky wire labels provided in the Nest box to tag each wire based on the terminal it is currently plugged into, not the color of the wire.
Step 3 – Understand Wiring Configurations
Consulting a Nest Thermostat wiring diagram is essential here. You need to understand what each wire does to avoid crossing circuits.
- R Wire (Power): Can be Rh (heating power) or Rc (cooling power). Provides the 24V current.
- W Wire (Heat): Sends the signal to turn on your furnace or heating system.
- Y Wire (Cooling): Sends the signal to activate your air conditioning compressor.
- G Wire (Fan): Controls the blower fan to circulate air through your home.
- C Wire (Common): Provides continuous, stable power to the thermostat’s WiFi and display.
If your old system has jumper wires (short wires connecting two terminals like Rh and Rc), remove them. Nest devices do not use external jumper wires.
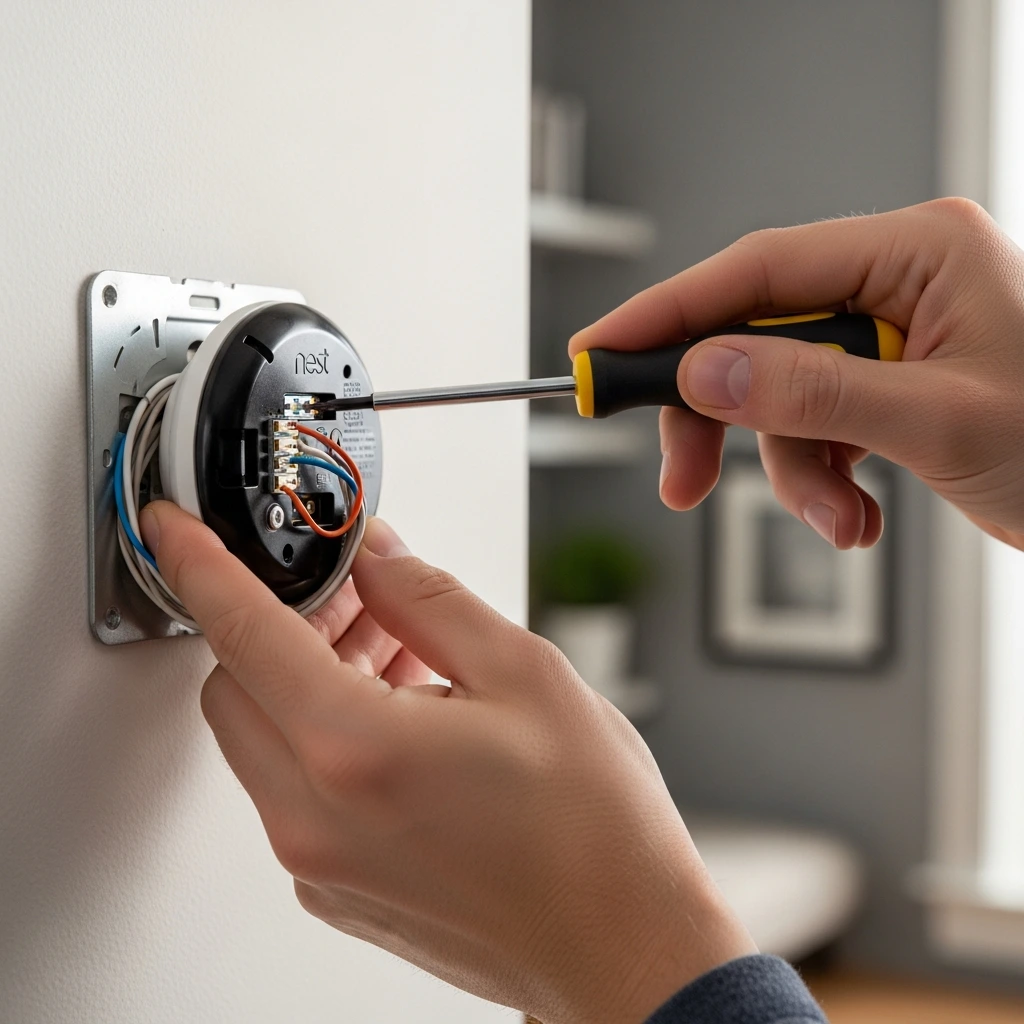
Step 4 – Install Base Plate securely
Now, unscrew the old wall plate and pull it away from the wall, being careful not to let the wires fall back into the hole.
Take the new Nest base plate and thread the wires through the center hole. Knowing how to install a Nest thermostat trim plate is helpful if you want to cover up old paint or screw holes left by the previous device.
Use the built-in bubble level on the Nest base plate to ensure it sits perfectly straight. Mark the screw holes, drill if necessary, and screw the plate firmly into the wall.
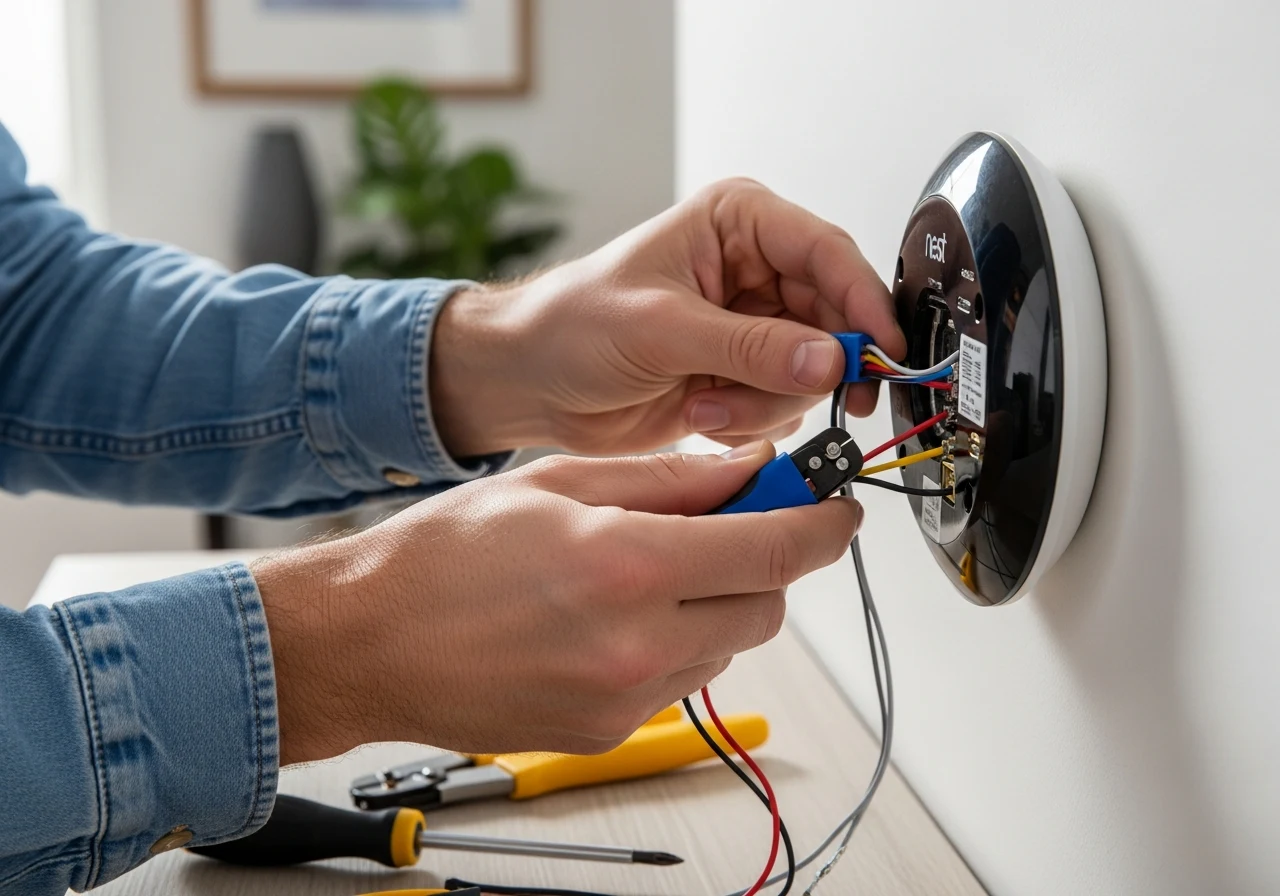
Step 5 – Connect Wires to Terminals
This is where you learn how to install the Nest thermostat wiring. Match the labeled wires to the corresponding letters on the new base plate.
Press down on the terminal button, insert the straight wire fully, and release the button. The button should stay pushed down; if it pops back up, the wire is not seated correctly.
Whether you are figuring out how to install a Nest thermostat with 4 wires, 5 wires, or 6 wires, the rule remains the same: follow your reference photo and match the letters exactly.
Step 6 – Attach Display Unit
Once all wires are securely fastened and tucked flat against the wall, it is time to attach the brain of the system.
Take the Nest display and align the connector pins on the back with the port in the center of the base plate.
Push the display straight onto the base until you hear a satisfying click. It should sit flush against the wall without wobbling.
Step 7 – Turn Power Back On Safely
Return to your electrical panel and flip the HVAC breakers back to the ON position.
Walk back to your thermostat. The display should light up immediately, often showing a blinking light or the Google logo as it boots up.
If the screen remains black after a few minutes, double-check that your HVAC system doors are fully closed, as many furnaces have safety switches that kill power if the door is ajar.
Step 8—Set up the Phone App
The physical work is done; now you transition to software. Learning how to install a Nest thermostat on your phone ensures you can control it remotely.
Open the Google Home app and tap the “+” icon to add a new device. Select “Thermostat” and follow the Google Nest thermostat install instructions on the screen.
The app will ask you to scan the QR code on the back of the device or manually select your model. From there, it will guide you through connecting to WiFi.
How to Set Up a Nest Thermostat
Once the physical installation is complete, setting up the software optimizes your energy savings. The Google Home app makes this incredibly intuitive.
First, ensure your phone is connected to your home’s 2.4GHz or 5GHz WiFi network and that Bluetooth is enabled.
The app will prompt you to answer questions about your heating system. You will need to specify your fuel type (gas, electric, or oil) and the type of delivery system (forced air, radiators, or radiant floors).
Next, you will configure your basic temperature settings. You will set an “Eco Temperature,” which is the baseline temperature the system will default to when you are away from home to save money.
Finally, the app will test the system. It will ask you to turn on the heat and confirm warm air is blowing and then test the cooling to ensure everything is wired perfectly.
[Internal Link: Smart Home Guides]
Installing Nest Thermostat Without C Wire
A common hurdle for DIYers is learning how to install a Nest thermostat without a C-wire. The C (Common) wire provides a constant 24V flow of electricity to keep the device powered.
Without a C wire, the thermostat attempts to “pulse” power from the heating or cooling wires to charge its internal battery. In many modern systems, this can cause the furnace to short-cycle or the thermostat to disconnect from WiFi.
If you lack a C wire, the best alternative is installing a Google Nest Power Connector. This affordable accessory attaches directly to your furnace control board and safely delivers consistent power without running new wires through your walls.
Alternatively, the standard Google Nest Thermostat can run on standard AAA alkaline batteries in a pinch. However, replacing batteries frequently defeats the convenience of a smart device, making the Power Connector the superior long-term solution.
Installing Nest Thermostat with 2 Wires
Many older homes with heat-only systems (like boilers or baseboard heaters) only have two wires: a red power wire (R) and a white heating wire (W).
Nest Thermostat installation 2-wire setups are generally compatible with the 3rd Gen Learning model and the Nest Thermostat E.
When executing how to install a Nest thermostat 2-wire setup, you simply plug the R wire into Rh and the W wire into W.
However, because there is no C wire in a 2-wire system, power draw issues are common. If you are learning how to install a Nest thermostat E with 2 wires, be prepared to add a plug-in 24V transformer or a Power Connector if the battery drains rapidly.
How to Install a Nest Thermostat Without Existing Wiring
If you are building a new addition or moving a thermostat location, you might face the challenge of having no wires in the wall at all.
Installing without existing wiring usually requires wireless kits or running fresh thermostat wire (18/5 gauge is standard) from your HVAC control board through your walls.
For completely wireless setups, you can use a plug-in 24V transformer adapter. You mount the thermostat on the wall, plug the adapter into a standard wall outlet, and run the two wires to the Rc and C terminals to provide power.
However, to actually control your heating and cooling without wall wires, you need a professional to install a wireless receiver relay at the furnace. Because this involves advanced electrical routing, professional help is highly recommended.
Generation-Specific Installation Guides
While the general steps apply to all models, slight nuances exist between generations. Paying attention to these details ensures a flawless setup.
4th Generation Installation Instructions
When figuring out how to install the Nest thermostat 4th generation, pay special attention to the new, streamlined base plate.
The 4th gen uses an upgraded dynamic sensor array. Ensure you do not mount it perfectly flush against a corner, as the side-facing sensors need room to detect ambient room temperature and motion accurately.
3rd Generation Installation Instructions
The 3rd Gen model is the most versatile. It includes a metal trim plate in the box, which is excellent for covering large holes left by legacy thermostats.
Be extremely careful with the rotating ring during installation. Press the center of the glass to click; do not push heavily on the outer metal ring to avoid damaging the internal rotation sensors.
Thermostat E Installation Instructions
The Nest Thermostat E has fewer terminals. It is designed to be highly accessible and blends into white walls.
The wire terminals on the E model are slightly smaller. Make sure the exposed copper wire is perfectly straight and clipped to about 3/8 of an inch before inserting it into the base plate.
Standard Google Model Installation Instructions
If you are researching how to install a Google Nest thermostat (the mirrored 2020 version), note that it requires two AAA batteries for initial setup.
Unlike the learning models, this device does not rotate. You use the touch-sensitive strip on the right side to navigate menus. Ensure your hands are clean and dry during the initial app syncing for accurate touch registration.
Nest Thermostat Installation in Different Locations
Where you live and the type of building you reside in can drastically alter the installation process.
Apartment Installation Guidelines
When researching how to install a Nest thermostat in apartment complexes, your primary hurdle is permissions and compatibility.
First, ensure your landlord allows smart thermostat installations. Save the old thermostat and take a picture of its wiring so you can easily reinstall it when you move out.
UK Installation Guide
Learning how to install a Nest thermostat, UK style, is completely different from the US. British systems often run on 230V mains power connected directly to combi-boilers.
If you are looking up how to install a Nest thermostat in London, you will almost certainly need to install a Nest Heat Link near your boiler. The Heat Link switches the high-voltage mains while communicating wirelessly to the low-voltage thermostat on your wall.
Electrical Box Installation
Sometimes, old thermostats are mounted directly onto standard electrical gang boxes rather than drywall.
To learn how to install a Nest thermostat on electrical box setups, you will need to use the steel wall plate adapter included in most Learning Thermostat boxes. This plate bridges the gap across the wide box opening, allowing the circular base to mount securely.
Nest Thermostat Installation Video
For visual learners, reading text sometimes isn’t enough. Watching a process from start to finish can clarify confusing wiring steps.
Searching for a Nest Thermostat installation video on YouTube is highly recommended before you start disconnecting wires.
We suggest watching the official Google installation video. It provides clear, close-up shots of the wire insertion and base plate leveling process, helping you visualize how to install Nest thermostat video instructions alongside this guide.
Nest Thermostat Installation Manual PDF
Having a physical or digital copy of the official documentation is invaluable, especially if you lose WiFi connection during the setup process.
You can easily find the Nest Thermostat installation manual PDF on Google’s official support website.
Downloading the PDF to your phone before you turn off your breaker ensures you have access to official error code definitions and the exact manufacturer wiring diagrams, even if your router goes offline.
Nest Thermostat Wiring Diagram (Detailed Section)
Understanding the wiring diagram is the most critical technical aspect of the installation. Let’s break down the most common configurations in extreme detail.
2 Wire Setup
This is common for heat-only systems. You will have a red wire (power) going to Rh and a white wire (heat) going to W1. There is no fan control or air conditioning in this setup. The system relies entirely on the heating cycle to circulate air.
4 Wire Setup
This is a standard configuration for older heating and cooling systems without a common wire.
- Red to Rc or Rh (Power)
- White to W1 (Heating)
- Yellow to Y1 (Cooling)
- Green to G (Fan): The thermostat will pulse power to charge, but a C-wire adapter is highly recommended for long-term stability.
5 Wire Setup
This is the modern standard and the ideal configuration for a smart thermostat.
- Red to Rc (Power)
- White to W1 (Heating)
- Yellow to Y1 (Cooling)
- Green to G (Fan)
- Blue/Black to C (Common) The C wire ensures constant, reliable 24V power, preventing battery drains and WiFi disconnects.
6 Wire Setup
This setup typically indicates a heat pump system or a two-stage furnace.
- Red to Rc (Power)
- White to W1 (Auxiliary Heat / Stage 1)
- Yellow to Y1 (Compressor)
- Green to G (Fan)
- Blue to C (Common)
- Orange or Dark Blue to O/B (Reversing Valve). The O/B wire is critical here. It tells the heat pump whether to reverse its flow to cool the house or heat it. Configuring the O/B valve incorrectly in the app will cause your system to blow hot air when you want cold.
Troubleshooting Installation Issues
Even with careful planning, minor hiccups can occur. Based on expert HVAC data and thousands of user installations, here are the most common issues and solutions.
No Power to Display: If the screen remains black, verify that the breaker is back on. Next, check that your furnace door is completely closed and latched. Finally, ensure the R wire is pushed completely into the terminal and the copper is straight.
WiFi Not Connecting: Smart thermostats require a 2.4GHz network for the longest range. If your dual-band router combines 5GHz and 2.4GHz, try creating a dedicated 2.4GHz guest network. Also, verify your device’s battery is above 3.7 volts in the settings, as low batteries disable WiFi to save power.
Heating Not Working (Blowing Cold Air): If you have a heat pump, you likely configured the O/B reversing valve incorrectly in the app. Go to the equipment settings and switch the O/B setting from ‘O ‘ to ‘B’ (or vice versa). If you have a conventional furnace, ensure the W wire is securely connected.
How Much Does It Cost to Install a Nest Thermostat?
Budgeting for this home improvement project is relatively straightforward. The cost varies entirely based on your chosen route.
If you choose the DIY route, wondering how much to install the Nest thermostat, the answer is $0. You only pay the retail cost of the device itself.
If you decide to hire a professional, researching how much it costs to install a Nest thermostat locally will yield varying results. On average, certified HVAC technicians charge between $100 and $300 for a standard installation.
This professional fee increases if they need to pull new wire through your walls to add a C-wire or if they need to install complex relays for multi-zone systems.
[Internal Link: Energy Saving Tips]
Final Tips for Easy Installation
To wrap up your project smoothly, keeping a few best practices in mind will save you time and frustration.
Think of this as your Nest Thermostat instructions for dummies checklist. Always, always label your wires before removing them. Never rely on memory.
Follow the Nest Thermostat installation instructions inside the Google Home app rather than guessing. The app’s logic tree is designed to catch errors before they cause damage to your HVAC unit.
Keep the copper wire ends clean and straight. If the old wires are bent or corroded, use wire strippers to cut the tip off and expose 3/8-inch of fresh, shiny copper for the best connection.
Frequently Asked Questions
Can I install a Nest thermostat myself?
Yes, the vast majority of users can install it themselves. The systems use low-voltage wiring, and the Google Home app provides clear, step-by-step visual guidance tailored to your specific wiring configuration.
Do I need an electrician to install Nest?
For standard 24V HVAC systems, you do not need an electrician. However, if your home has line-voltage heating (110V/240V thick wires), a complex multi-zone damper system, or a UK-style mains-connected boiler, hiring a professional is highly recommended.
Does Nest work without a C wire?
Yes, it can work without a C wire by pulsing power from the heating/cooling lines, but this often leads to battery drains and WiFi drops. Installing a Google Nest Power Connector is the best solution if you are missing a dedicated C wire.
How long does the installation take?
For a beginner, the entire process—from turning off the breaker to completing the app setup—typically takes between 20 and 45 minutes. Having your tools ready and taking clear reference photos will speed up the process.
What should I do if my system blows hot air in cool mode?
This is a common issue with heat pump systems. It means your O/B reversing valve wire is configured backward in the software. Open the Google Home app, navigate to thermostat settings, and switch the O/B valve setting to the opposite configuration.
Conclusion
Taking the leap into smart home automation is a fantastic decision. By following this guide, you’ve successfully navigated turning off the power, mapping your wires, and syncing your new device, turning a complex task into a rewarding DIY achievement.
We strongly encourage the DIY approach for standard 4-wire and 5-wire setups. Not only do you save significantly on professional installation fees, but you also gain a practical understanding of how your home’s HVAC system operates.
Now, you can immediately begin enjoying the long-term energy-saving benefits. Your new Nest thermostat will learn your daily routines, automatically adjust to eco-friendly temperatures when you are away, and help lower your monthly utility bills.
Beyond saving money, you are actively reducing your home’s carbon footprint. Enjoy the seamless convenience of controlling your perfect home climate right from the palm of your hand!
Evidence-Based References:
- Exploring smart thermostat users’ schedule override behaviors and the energy consequences
- A Systematic Study for Smart Residential Thermostats: User Needs for the Input, Output, and Intelligence Level
- Smart Wifi Thermostat-Enabled Thermal Comfort Control in Residences
- Assessing the energy savings of smart thermostats